 Currently, we are still in the process of constructing the TechnoCart frame. We are also researching different wheel configurations, wheels types, and panelling which we hope to determine the preferable specifications of by meeting with Mr. Baraty this week. Our plan for the next three weeks before winter break is to complete the frame with attached wheels while we continue to order miscellaneous pieces such as hinges, cabinets, etc.
0 Comments
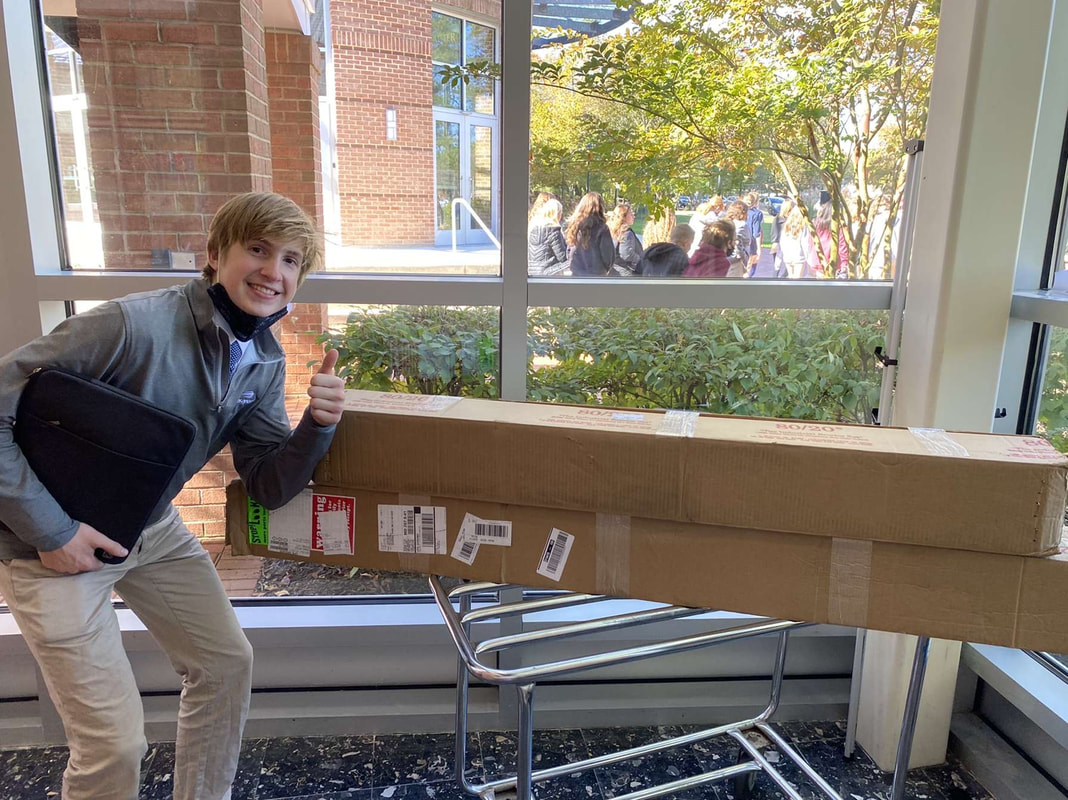
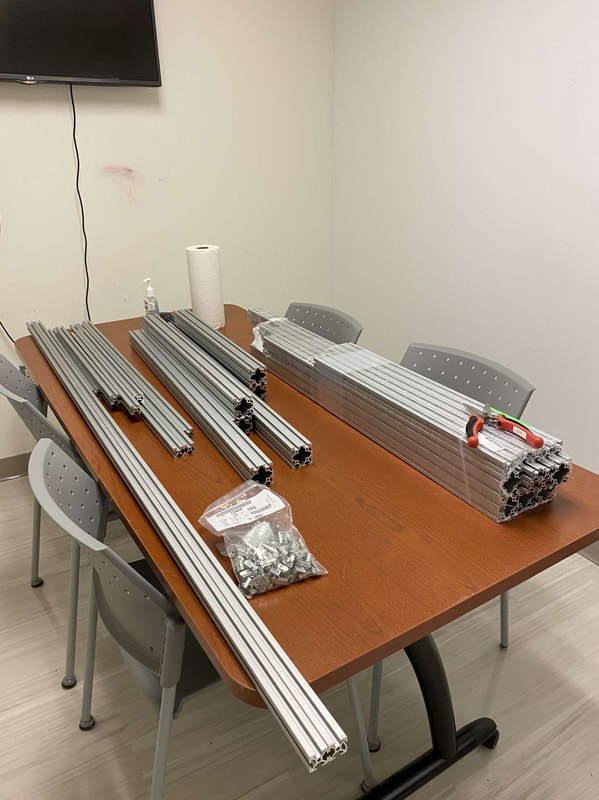
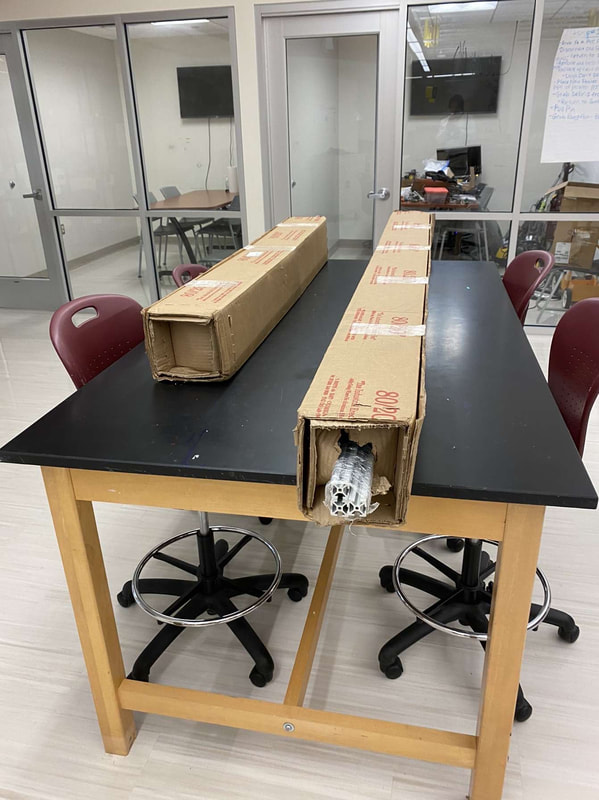
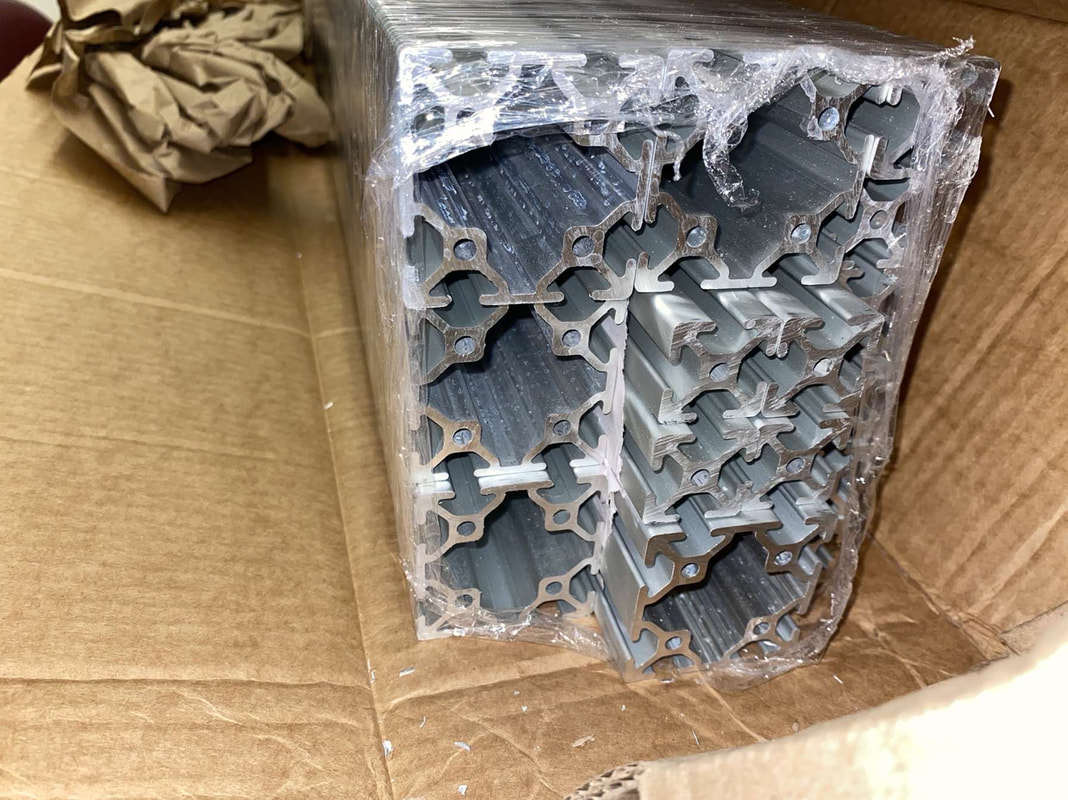
What an amazing stroke of luck!Even though the 80/20 website predicted our order to arrive mid-to-late December, crazily so, our parts already came in! No need for questions - just thankfulness. We unpacked the extrusions and set them up on a table in the GIC to be set up for assembly. We have been fiddling around with a few pieces and a hex wrench to plan out the connections with inside-outside/inside-inside connectors. Soon enough, we will get into assembling our frame. When we were once worried that we may not have our frame pieces come winter break time, we are now ahead of the schedule we hoped to be on. Here it is -- the birth of the TechnoCart!
We completed our frame order to 80/20! Although the price tag was quite hefty, luckily, we completed our design process without a cent spent. As we await our pieces, we are now researching how to incorporate wheels, pneumatic hinges, monitor arms, among other assets into our assembly process. Our project is becoming physical! 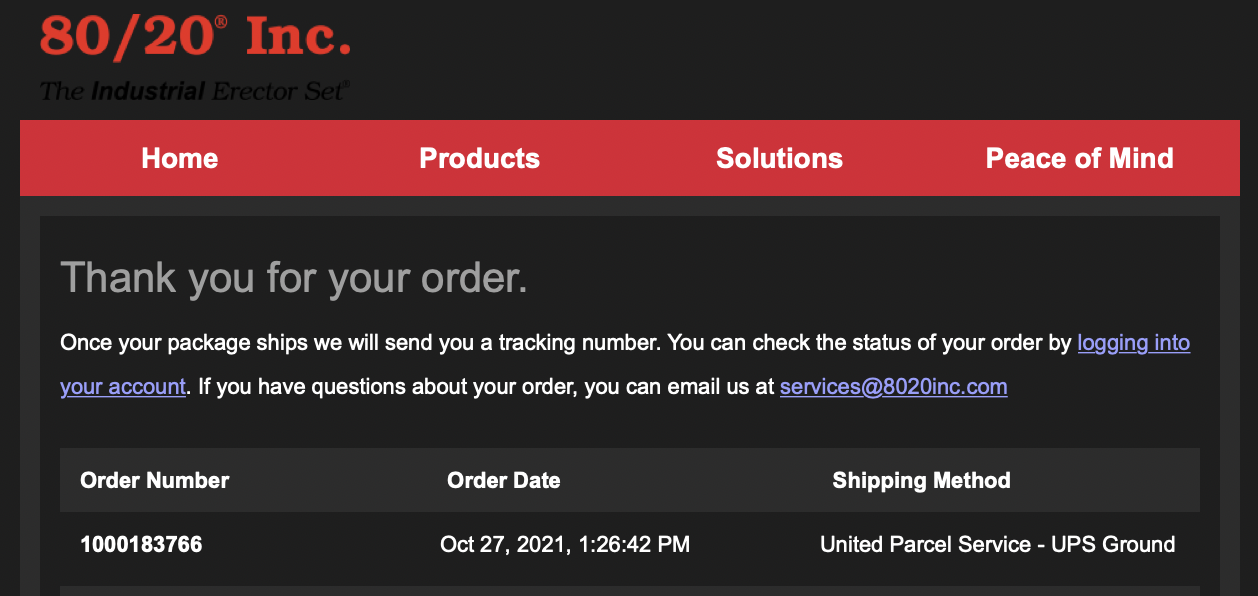 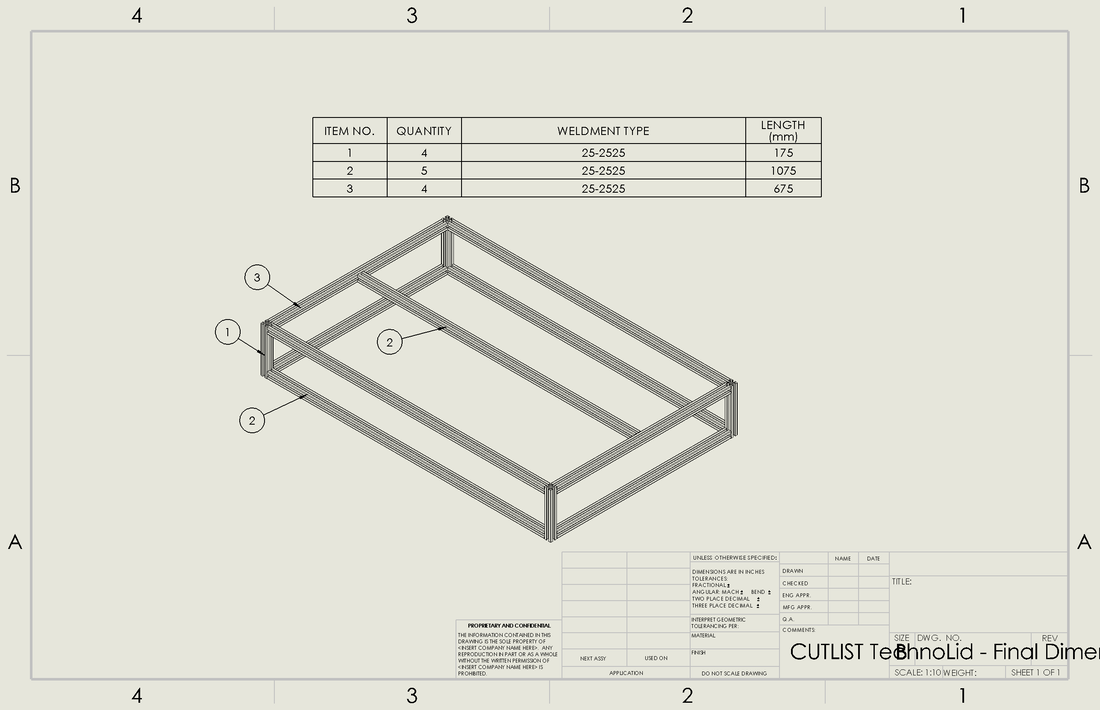 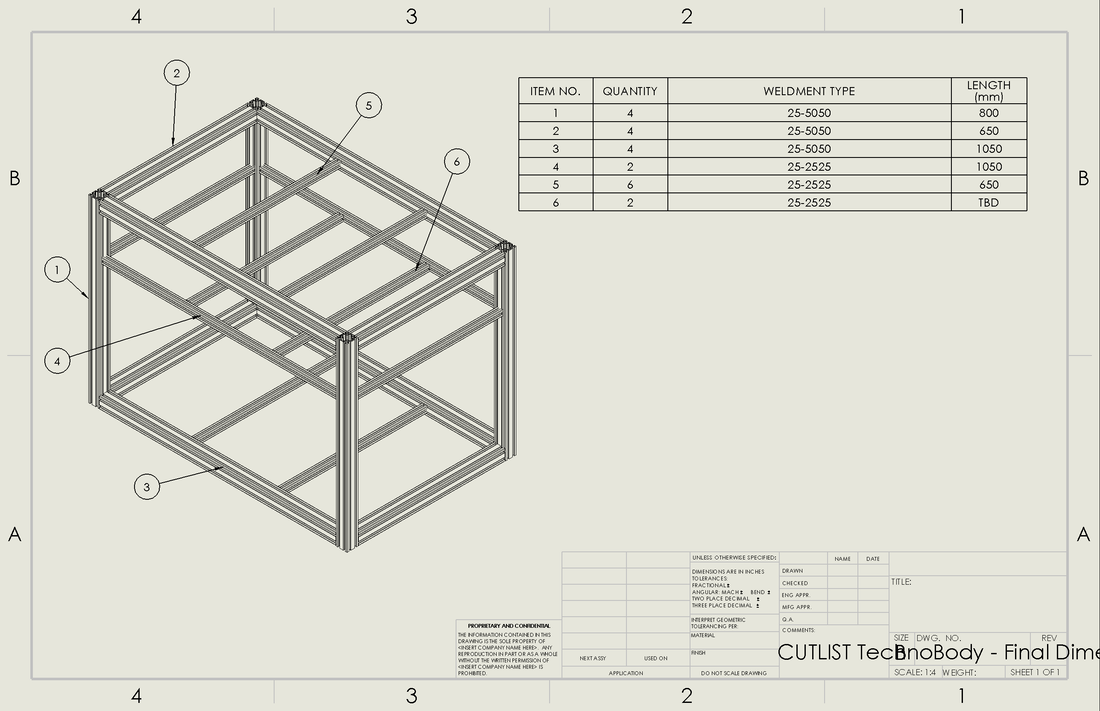 In pursuit of making our order to 80/20, we have made professional cut lists (as shown above). Now, since when we have (almost all) of the lengths of the bars set, we will move our focus towards figuring out the connectors, end caps, wheel holders, etc. for the order, which will undoubtedly be challenging.
After careful consideration by Mr. Baraty, Ms. Carsley, and many more of the Severn Fellows board, we have finally been accepted into the Severn Fellows program! We will now start the ordering process for the Technocart and plan to order our materials in excess. With the help of the 80/20 consultant and Mr. Baraty, we are shooting to complete our order within the month.
We have focused our recent time on formulating our presentation for our summer progress. We were proud to present our 40% completion to Mr. Baraty and Mrs. Carsley on Wednesday!
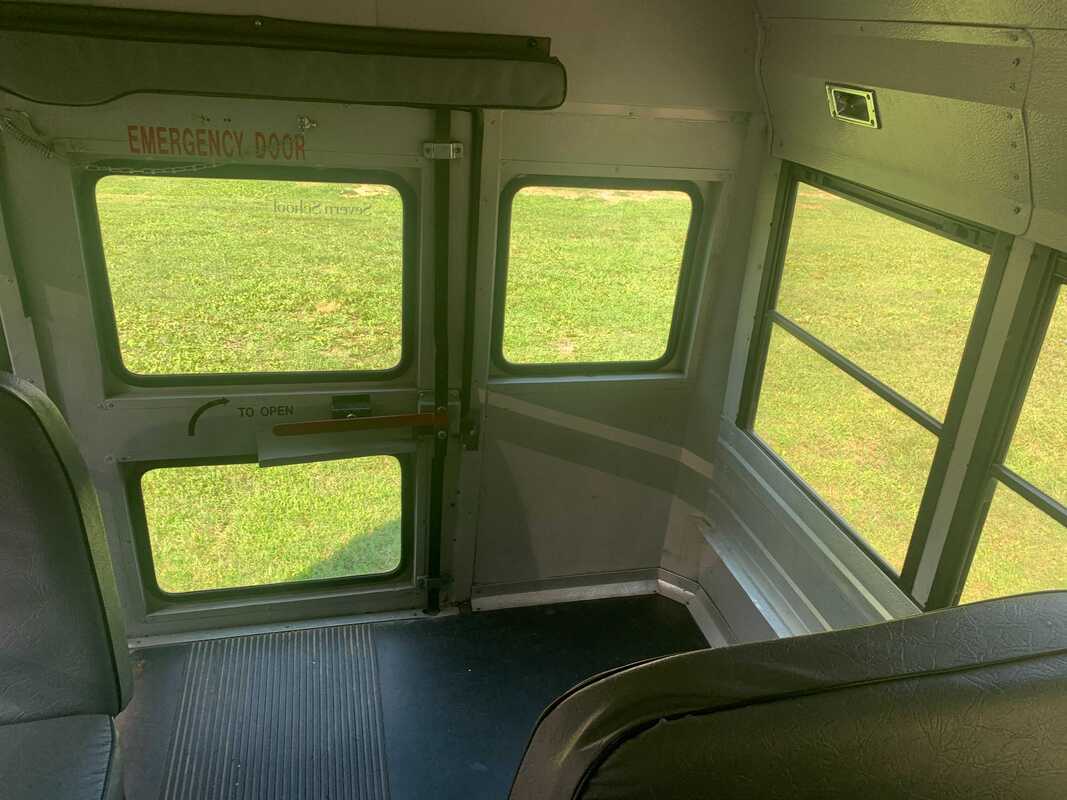
Click here for the presentation. At last, we have the final frame models of the TechnoCart! 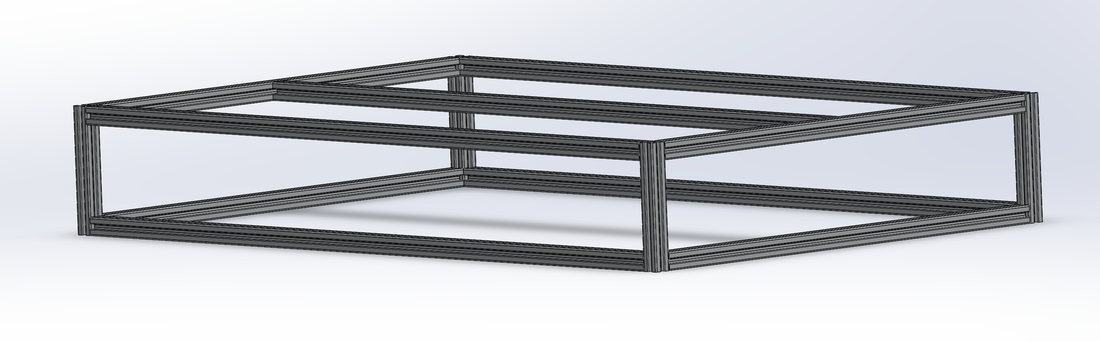  DIMENSIONS Body - height: 800mm, width: 1150mm, depth: 750mm Lid - height: 150mm (depth & width the same as body) Main frame is made of 25-5050 profile 80/20, all other extrusions are 25-2525 profiles. These dimensions did NOT come easy. We had many factors to account for and ended up having to make sacrifices and prioritize. The TechnoCart must fit the MATE ROV robot, and it must be able to be worked on top of-- but it can't be so huge that it won't fit in the minibus (or, in general, be a behemoth to the point that it's uncomfortable). So to start, I paid a visit to the minibus to measure the space inside the bus, not just the door the cart must fit through. Thank you Ms. Duguay for letting me in the bus, and thank you Ms. Howell for the tape measurer!
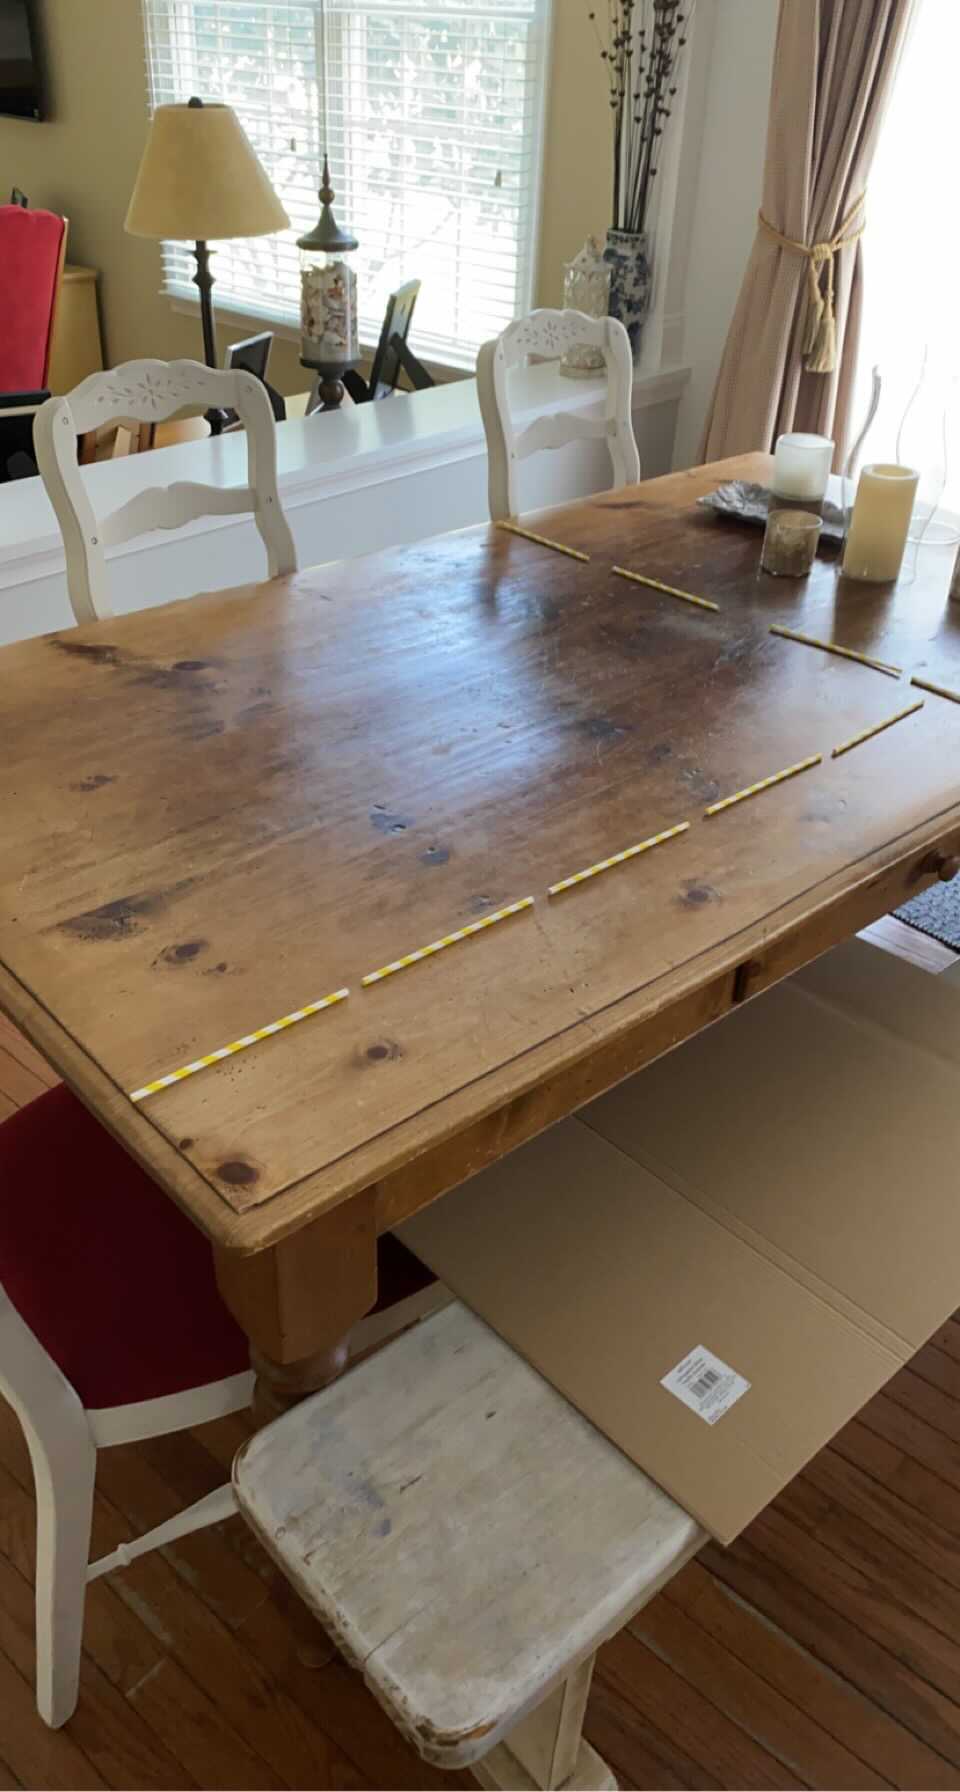
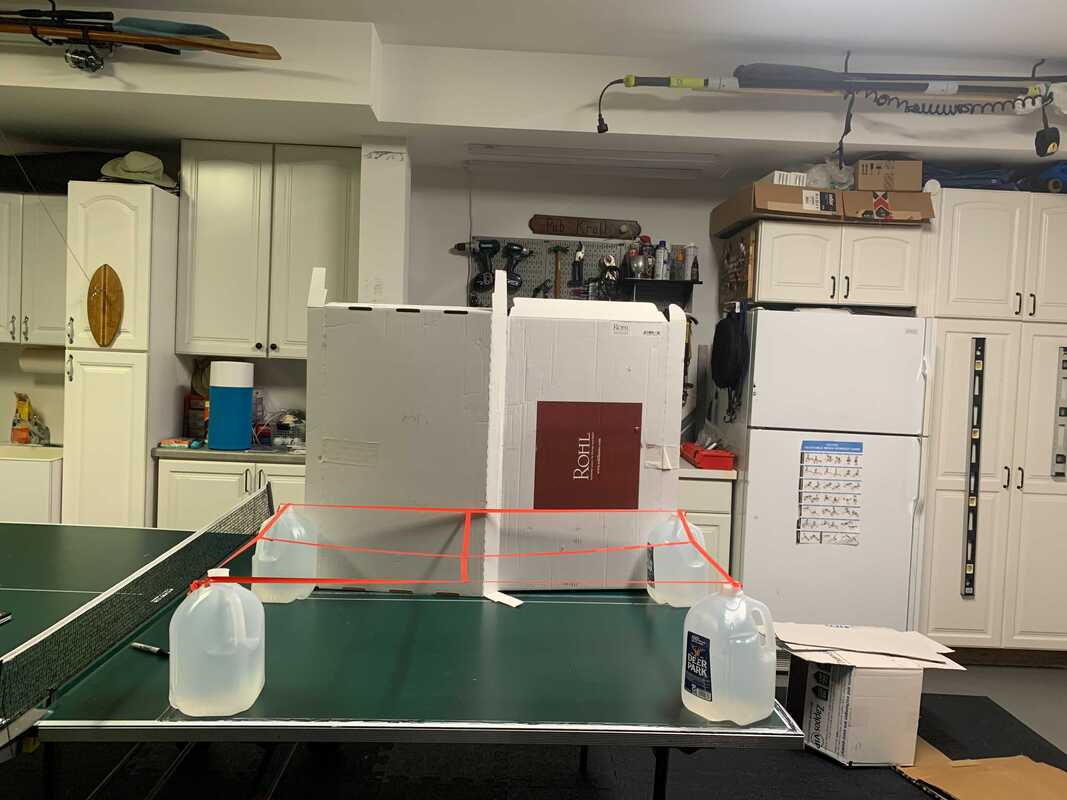
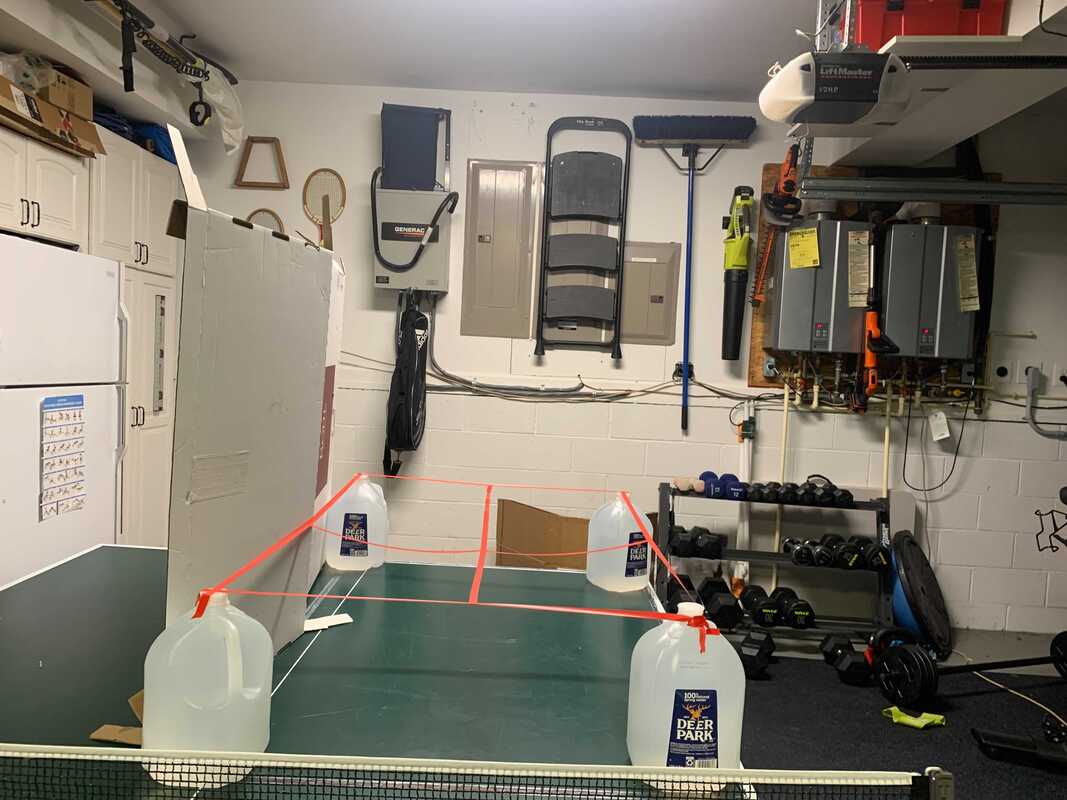
We then had all the knowledge of our limiting parameters for the TechnoCart. Now, Zach and I had to visualize. Sure, SolidWorks can output a model on a 2D screen from dimensions that we give it, but we needed to physically see and interact with a model to get a sense of our then-current dimensions.
Taking the feel of the size into account, Zach and I were then ready to discuss and render our final dimensions of the frame. It took hours on hours-- within separate days of discussion-- of back and fourth collaboration to finally arrive at our satisfying, end-of-summer conclusion. 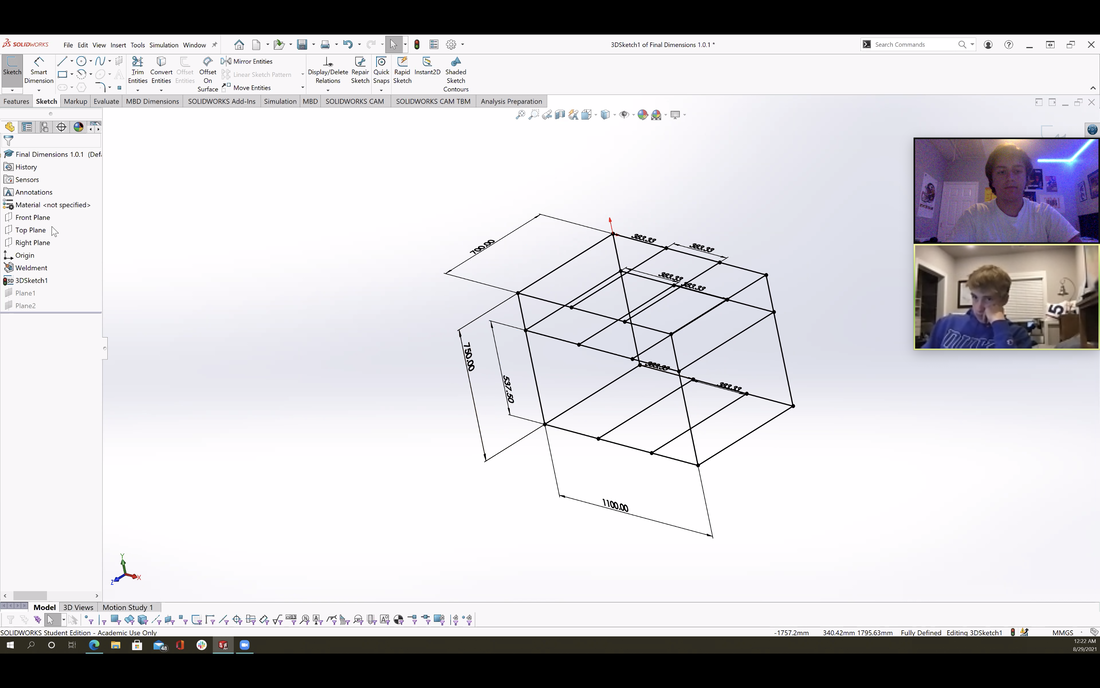 And now, we can present our final models!
(I have a screen recording giving a 360 degree view of the model, but posting video on Weebly requires a purchase. If you would like to see it, contact me, and I'll send it your way!) 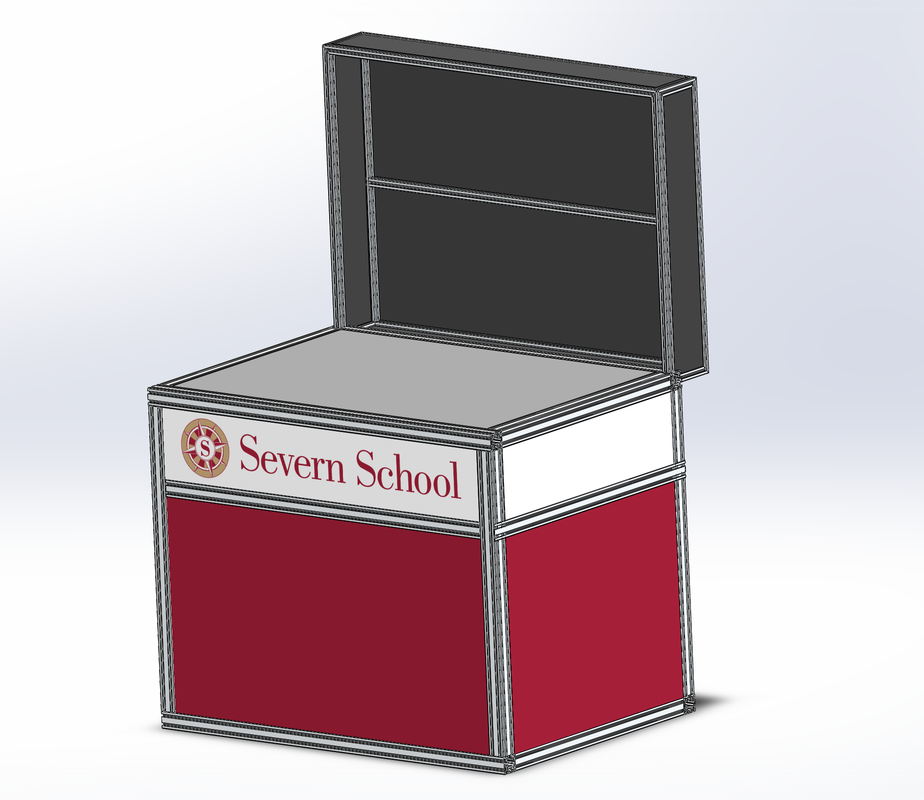 We now have a fully rendered representation of the body of the TechnoCart!
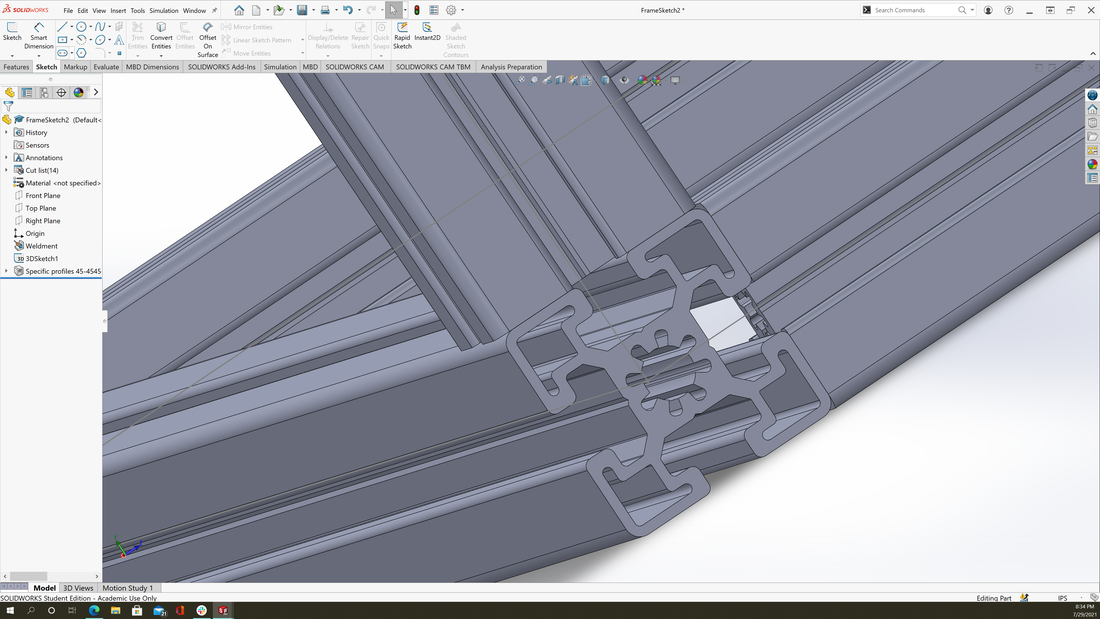
We have made a design change: rather than a loose extension on top of the cart body, we are creating a clamshell-like collapsable 'lid' on top that fixes in an upright position. The lid houses two monitors mounted on the crossbeam (as represented in the SolidWorks model above), and it will have a pneumatic closing mechanism to increase ergonomic quality and protect the monitors from damage. It is also advantageous in terms of transportation and versatility, so we are glad we have made the switch in design. We have also contacted an 80/20 consultant and worked with them to finalize our extrusion profile choices, which we used for the model above. We have decided to use the 25mm series of 80/20. For the main framing bars, we are using the 25-5050 profile (50mm x 50mm), and for the support beams (inside cart panels) and lid framing, we are using the standard 25-2525 80/20 profile. Although the 50x50 profile sure has some heft to it, it will ensure that the cart can withstand any amount of weight that it needs to hold. It isn't easy to see in the model, but the 50x50 profile also has a particularly large reservoir within the extrusion which opens many opportunities for pneumatics and other mechanisms. Our primary order of business now is to completely finalize our dimensions. We currently have a solid sense of them, which is the dimensions used for the model representation above, but we have a few more factors to reconsider, for example, the about 2 inch size of the 80/20 frame pieces themselves. Once we accomplish that, we have freedom to customize our SolidWorks model to the extent that we please. I have found out how to imprint the Severn Logo onto the cart model, which I think is pretty sweet, and that is just an example of the customizing capabilities. Of course, these color choices for the cart are not final. We have loads of time in between now and panel assembly to decide that-- it is pretty neat, though, to be able to visualize the TechnoCart way before we are even near the physical product. Also, we are still debating if modeling the cabinets and drawers of the cart on SolidWorks is worth our time. It will indeed better represent the TechnoCart within our render, but at the same time, these cabinet and especially drawer sizes are subject to change once we have the physical frame assembled, so the modeling of them will likely serve no purpose other than an aesthetic one. Plus, it is hard to properly model the drawers since we cannot visualize the size of the 80/20 fasteners yet-- that will have to wait until frame assembly. As you can see, there is a lot I can talk about, but these are the main updates we have so far-- we are pumped for the next update where our model will be completely finalized! 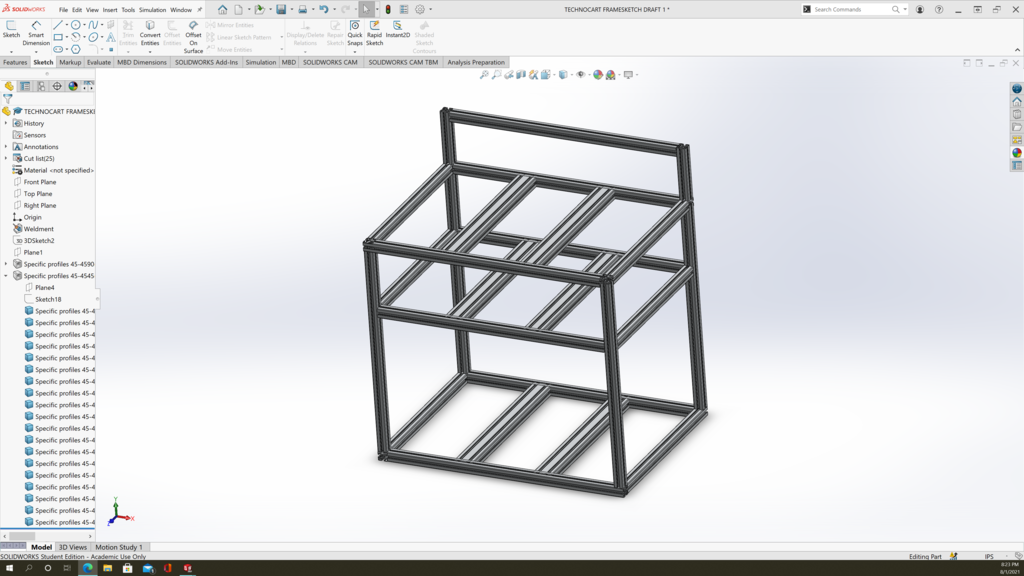 August 1st: TechnoFrame version 1.0.0, modeled based on the sketch below. It includes 45mm x 45mm 80/20 for the main frame, and 45mm x 90mm profiles for cross supports. Dimensions: length: 45 inches depth: 32 inches height: 50 inches (10 inch extension).  I (Nate) had a late-night surge of energy tonight, so I capitalized. Above is a sketch of the TechnoCart design that Zach and I have been discussing, researching, and picturing over the past month-and-a-half. Rather than describing the different features we were brainstorming, a full-blown drawing encapsulating all main aspects of the cart proves much more effective in conveying our thoughts. Take a look around, zoom in on my quite sloppy handwriting, and I believe you will acquire a sense of our design plan. This was no easy task, yet it was definitely worth the time. Modeling the cart in SolidWorks is much easier with a reference 'blueprint' for us to work from.
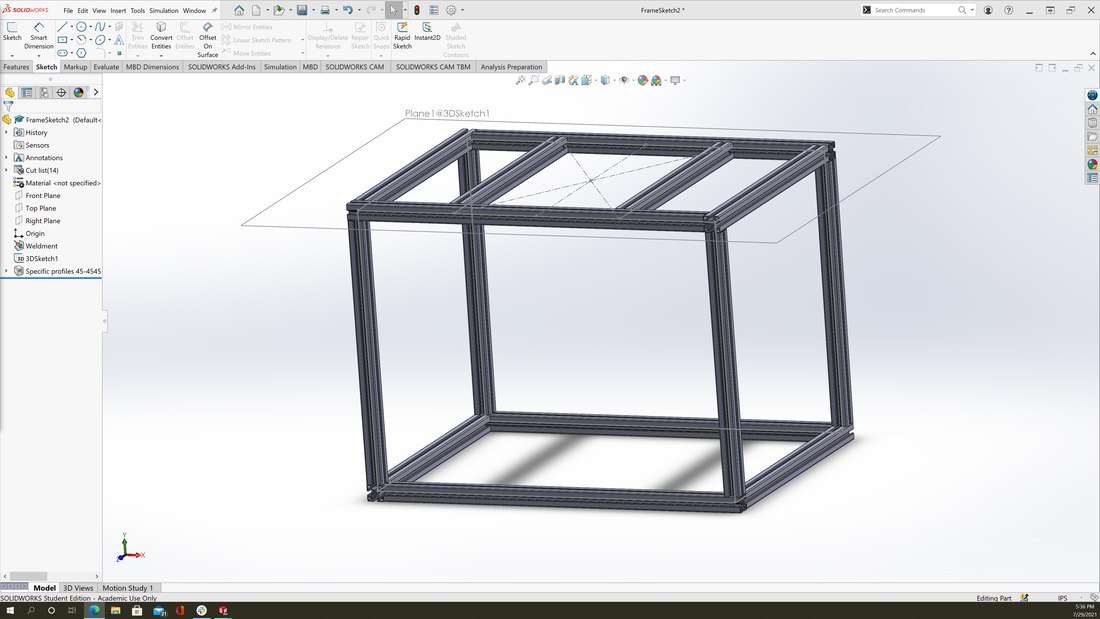
Nate - 13 hours into my grueling SolidWorks self-training, Team Techno has reached a significant milestone in our project journey. I 3-D modeled a 30x40x30 aluminum extrusion 80/20 frame-- the kind of frame that will outline our TechnoCart. After hours of head-banging confusion, I finally tied together the pieces of how to save a custom weldment profile and apply the extrusion to a 3-D sketch. We need to refine the frame by optimizing the dimensions, analyzing the 80/20 catalog for the most effective extrusion sizes (for the frame above, I used the 45-4545 series of 80/20, the largest profile available), applying the correct corner treatment, creating sufficient cross-supports for the frame, and figuring out the best fasteners to use in order to lock the separate extrusions together during assembly. Beyond simply spending hours training and modeling with the program, both of us have been putting solid time into researching components and brainstorming different design configurations. Zach and I have been collaborating consistently about SolidWorks training, potential designs and design modifications, and more. We have also contacted Mr. Baraty on multiple occasions, and have met with the three of us over zoom. Slack has proved to be a great resource to keep the three of us continuously in touch, as well as for logging progress and sharing helpful resource videos/articles.
Zach - After researching a couple other 3D design software's, I came across a website called Vention. This website uses its own type of aluminum extrusions (extremely similar to the 80/20 extrusions) in order to design ideas. Vention is very different to SolidWorks (which we intend to design our final model in) in that the design process is very straightforward and streamlined, with the parts being very accessible and the design tools being simple to understand for the average user. Because of this fact, I decided to use this website to design a prototype that Nate and I could roughly base our final SolidWorks model off of. While the model above will not resemble as our final design much, it is a good reference tool for our future endeavors.
|